Books!

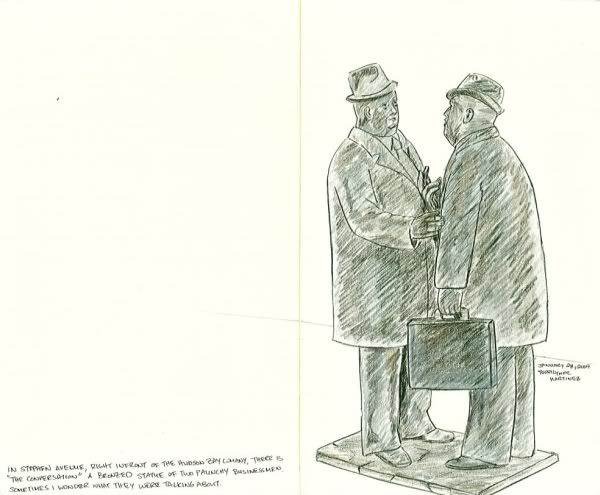
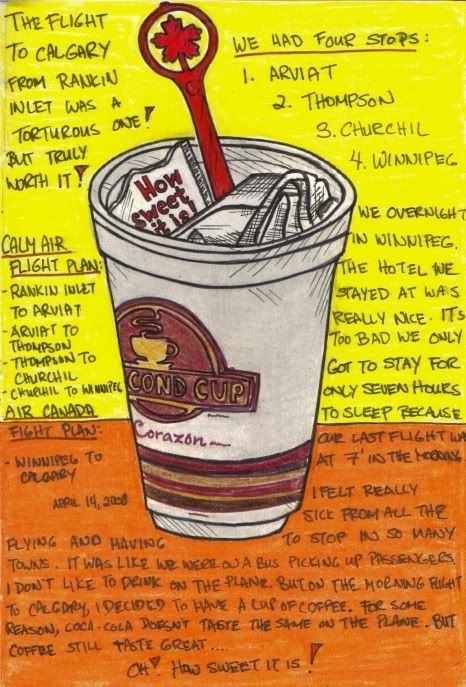
ink, white gouche on 11×14 bristol paper

Hi! It’s been months since I’ve updated this blog.  Hope you guys like the new layout!  I plan to post more often with new drawings to get myself to draw more. haha.

I do quite a bit of artwork at my current job as a Library Assistant.  I do most of their signages and displays.  But what I enjoy best of all is making artwork for the Children Programs & Storytime like flannel storyboards, crafts, games, etc. for the kids to enjoy.  I may post up a few pictures of the things I’ve made for the Children programs.

The drawing with the stack of books was for a poster to help promote the book club.  We ended up not needing it but it was still fun to draw!  It was all done in ink & white gouche on Bristol paper.

Moleskine Sketches

As promised, here are my sketches from the Moleskine exchange that my cousin and I are doing. Enjoy.

Pumpjack. Pencil & Ink.

Grain Elevator – Nanton, Alberta. Watercolor, Pencil Crayon & Ink.

Chinatown’s Dragon City Mall – Calgary, Alberta. Pencil.

“The Conversation” Stephen Avenue – Calgary, Alberta. Pencil Crayon.

Calgary Flames Jersey. Pencil Crayon and Ink.

President Barack Obama – Pencil.

mmm… coffee.

Moleskine Sketchbook, Ink, Pencil crayon

Finally, an update! HOORAY!

Sorry, I haven’t updated since… February 2009… wow, that’s almost a year ago.  But I have good reasons for my absence.   I finally learned to drive, I got a new job, new car, new laptop, new haircut… many things! 2009 was a pretty busy year for me.  Now I’m back, hopefully this time I will update a lot more often.

As for the drawing above, it’s one of the drawings that I did for the Moleskine exchange that my cousin and I are doing. I wanted this Tim Horton’s cup drawing to have that same style as the one I did for the Second Cup drawing.  I don’t know what’s with me with coffee cups lately, but it turned out pretty well, don’t ya think?

I’ll be posting up some more scans of my drawings from the Moleskine exchange on my next post.  It will just be my drawings for now though. But maybe in the future, when it is all done, we’ll have all the pages put up for everyone to see.

If you would like to keep up with the latest updates, please subscribe to my blog, using the link at the bottom right.

Chinatown


Happy Chinese New Year!!! It’s the year of the Ox which is my Chinese zodiac so hopefully this year will bring me many good luck. haha. Above is a drawing that I did for the Moleskine exchange that my cousin and I are doing and coincidentally completed the drawing on Monday (Chinese New Year) isn’t that funny? Sorry about the picture, the lighting wasn’t very good where I was at and this was the best I could do.  The building that I drew is the Dragon City Mall located in Calgary’s Chinatown which I always go to whenever I get a chance to go downtown. I love that mall! I’ve been going there since I was eight or nine years old, I would go there with my parent and brother to buy Anime posters like Sailormoon and DragonBall Z and other cute stuff. (I still do that now btw. haha) They now have a Japanese beauty products store there on the second floor for those who love Japanese cosmetics like I do. I also get my haircut there ($25.00 for a haircut is a good price!) and the BEST Bubbletea IMO is there too. Calgary’s Chinatown is a bit small but even though I think that everything that I need is there.

As for the drawing I did it all in pencil. I haven’t done a pencil drawing in a while and I forgotten how messy it can get. haha. But I love it though. If you are wondering what’s that strip of words on top of the drawing, it’s actually double sided tape for the tracing paper that I’m going to attached so that the pencil drawing doesn’t smudge off on the next page. I’ll take another picture of it when I apply the tracing paper for my next post so that you can see what I mean. Also I’m selling a bunch of printer Laserjet ink cartridges (HP and Lexmark – Brand new) on Ebay. If you are interested in buying here is the link. Gong hei fat choi!!!!

What’s this?

Are my eyes decieving me or did I got a lot of hits today? haha. I usually get about 30 – 40 average hits a day but this is pretty cool. The most hits I ever got was in Feb 26, 2008, 107 hits. lol. This is not the first time I’ve hit around the 80’s but its nice to see it jump like that. haha. Anyways, here’s another sneek peek on our Moleskine exchange between my cousin Derrick and I.

This drawing is based on Nanton’s two beautiful fully-restored Grain Elevators on north-bound Highway 2 here in Alberta. I’ve been only there twice but I’d like to go back.  I drew this with Winsor & Newton watercolor, Staedler pigment liner, and Prisma Pencil Crayons. Usually when I draw, I don’t plan out how the drawing should look like in the end, I just go as I go along.

I’m pretty suprised by the outcome (that’s usually the best part of drawing – seeing the finish product). I was going to leave the sky with just blue watercolor that I painted on but I decided to scribbled on some white pencil crayon to give it a bit more characteristic and a bit of purplish blue crayon to blend it in with the blue. It was pretty risky but it turn out pretty darn good, dont ya think? =)

UPDATE: I ended up having 99 hits at the end of the day. lol. I was just one hit away from 100!!!

My Workspace

Wacom Cintiq 21ux, Dell Laptops, Cintiq pens.

HAPPY NEW YEAR! Sorry for not posting this sooner been busy with Holiday stuff.  As promised I have posted up some pictures of  my new Cintiq that my brother Lennard got me as an early Birthday present around mid November (my birthday was on the 26th of December).  He also got me the Art pen and Laptop to go with it as well (Ain’t he the best?)  He says that this would be something that can help me get my career started. How nice eh?

Adobe Illustrator CS3, Cintiq Art Pen (left), and Cintiq Grip Pen (right)

I don’t know much about Digital Art ’cause I’m more of a traditional artist but I think this would really help me get me into the art industry.  I’m teaching myself how to use Adobe Illustrator at the moment, got a whole bunch of books at the Library which I think is alot cheaper than going to courses and all.  Apparently with Adobe Illustrator you can make really realistic drawings almost photographic images, which I find really intrigueing. Hopefully soon I can do that. haha.

All furniture from Ikea. haha.

I also bought myself a SmudgeGuard glove to prevent smudges on the tablet (you can see it on the second picture next to the Moleskine). It can also be used while drawing with traditional media as well so you won’t smudge out your drawing.  It’s pretty awesome.  I’m also planning on buying the Corel painter X, heard some good stuff about it, but I’ll probably buy that next time once I get the hang of Adobe Illustrator CS3.  Anyways, if your a Wacom, Cintiq, or Adobe Illustrator user please drop me a comment and maybe give me some good pointers. Thanks!


Moleskine

Yikes! I haven’t posted in awhile! Anyways, my cousin Derrick and I are doing a Moleskine exchange. We started it around July.  I thought it would be a great art project for the both of us, plus it’ll get me to do more drawing. haha.  He lives down in Conneticut and is an amazing artist.  You can check out his flickr page here.

I’m almost done my 10 pages so I’ll be sending it out in about a week or so.  I put a preview of one of my drawings up there.  I’m not too sure yet if we are going to post the drawings online but keep checking back for updates.

Also, my brother got me a Cintiq 21ux! Can you believe that? I had it for almost a month now, I’m still learning to use Adobe Illustrator and Photoshop.  I even got some books from the library to learn from. Maybe in a few months I’ll get good at it. =)  I’ll post up some pictures some time this week. So check back soon!

I love my Reese Peanut Buttercups!

Ru Journal. Pencil Crayon and Ink.

I’ve only liked two kinds of chocolate bars, Reese and Oh! Henry.  Those were the only chocolate bars I ever reached for when I have a chocolate craving or when I needed an energy boost.  Also, I think it’s the biggest reason why I gained an extra 10lbs this year. haha.

The drawing was done using ink and pencil crayon using the continuous line technique.  If you do not know how or what a continuous line technique is it’s basically drawing without taking your pencil/pen away from the paper.

It’s really fun to do because it’s a great drawing exercise and you don’t have to make the drawing so perfect . Plus it looks great at the end.

Copic Markers – Using The Hand Color Chart

CopicMarker.com has a hand color chart on their website that you can print out.  So today, I want to show you guys how I use it for my Copic markers.

Materials: The paper that I use is the Bienfang Graphics 360 paper, it’s a thin translucent paper so it does not suck up too much ink from your marker. Some brands have the right side of the paper on the back so if you use the wrong side of the paper you get a more streakier and more translucent grainy effect.  But if you use the right side, you get a more blended effect (see below). You can use either side depending on your liking.

You will need scissors and double sided adhesive or any kind of tape or glue.

I used double sided adhesive tape for this example. I cut out a small piece of marker paper based on the size of the chart and put several small adhesive tape on the sides where I want the paper to be glued (see photo below).  I then place the marker paper on top of the adhesive and since the marker paper is translucent you can see through the paper (see second photo below).  I suggest using the same type of paper that you draw with instead of drawing on the chart that you printed out so that you get a better idea of how your colors will turn out.

For this chart I’m using the Original Copic Markers that I bought in a 36 set and I find that using the broad end of the marker is a lot easier to fill in the area of the chart.

When you have completed coloring in your chart, you then can use a black ink pen (for the lighter colors) and a white gel pen (for the darker colors) to fill in the names of the markers you colored in.


Then Voila! You got yourself a color chart!

You can have it on your wall or with you when you draw and if in the future you buy more Copic Markers you can then add them easily on your color chart.

If you have any suggestion or even better ideas on creating color charts for Copic Markers please leave a comment.

Link: Copic Colorchart download, CopicMarker Website